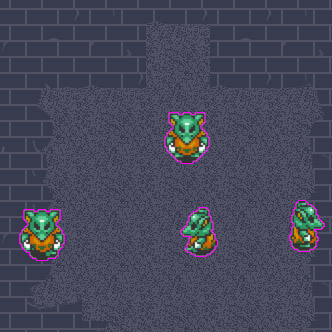
While cooking up a new feature for our forthcoming title, Dungeon Rustlers, we thought it may be handy to denote some enemies as special. These “special enemies” drop extra loot but how could we render them differently for the user to easily tell they should be prioritized? Applying an outline, or stroke, to the sprite would be great!
In the example below, I’m dynamically rendering a magenta border around a familiar baddie from the SNES days!

Credit to Shaun Spalding who is doing some great Game Maker tutorials on his Youtube channel. I used his tutorial for the basics of the outline shader. Definitely support him on Patreon!
Where my work expands on Shauns is to offer the ability to customize the color of the outline rather than always assuming the outline should be black. Before continuing on, please check out Shaun’s outline shader tutorial as I won’t be going into the details of how that works.
Here is the original sprite sequence from the example above. You’ll note that there is no outline, just our little baddie, walking around.
![]()
Credit to Bruce Juice from Spriters Resource.
Here is the complete fragment shader.
//
// Outline shader
//
varying vec2 v_vTexcoord;
varying vec4 v_vColour;
uniform float pixelWidth;
uniform float pixelHeight;
void main()
{
  // Compute the textel offsets
  vec2 offsetX;
  offsetX.x = pixelWidth;
  vec2 offsetY;
  offsetY.y = pixelHeight;
  float originAlpha = sign(texture2D(gm_BaseTexture, v_vTexcoord).a);
  float alpha = originAlpha;
  // Combine the alpha from all surrounding textels.
  alpha += ceil(texture2D(gm_BaseTexture, v_vTexcoord + offsetX).a);
  alpha += ceil(texture2D(gm_BaseTexture, v_vTexcoord - offsetX).a);
  alpha += ceil(texture2D(gm_BaseTexture, v_vTexcoord + offsetY).a);
  alpha += ceil(texture2D(gm_BaseTexture, v_vTexcoord - offsetY).a);
  // Only blend with the image_blend factor if the original alpha was 0.
  // That means the image_blend parameter is the outline color.
  gl_FragColor = (v_vColour * (1.0 - originAlpha)) +
                 texture2D(gm_BaseTexture, v_vTexcoord);
  // Use the computed alpha
  gl_FragColor.a = alpha;
}
Looking through the code, you can see that the outline is built by adding up the surrounding pixel’s alpha values. Pixels that are 1 unit away from the edge of a sprite will become the outline by increasing their alpha to a non-zero value. That’s easy enough – but how do we determine if the output color for a pixel should be the texture, or a color value?
The secret is to check the original pixel’s alpha component! If it’s not 0, we assume it’s part of the outline. Obviously, this won’t work for sprites with completely transparent pixels in the *middle* of the image. For pixels with partial alpha (0.001 – 0.999) we use the sign() function to simply turn that into 0 or 1 (if greater than 0).
Here’s the secret blending sauce:
gl_FragColor = (v_vColour * (1.0 - originAlpha)) +
               texture2D(gm_BaseTexture, v_vTexcoord);
By subtracting 1 from the original alpha, we end up with a value of 1 for the outline pixels, and 0 for the image pixels. Multiplying that by the v_vColour (aka image_blend), we are left with either the image_blend (for outline pixels), or 0 (for non-outline sprite pixels).
We then add the blending color to the source pixel. If we’re on an outline pixel, the blending color *IS* the color, since the texture has no color data at that pixel. If we’re on a non-outline pixel with image data, we blend it with nothing by adding 0 to it.
The key to this shader is that there is no expensive branching logic. We could have done if statement to check the alpha component of the source pixel – but that’s expensive on the GPU. This method circumvents the need for branching and just pumps out blended pixel goodness. Yummy.
