Let’s talk Instagram for a bit. You see something you’d like to take a picture of, and share with the world. You grab your phone, position it directly over your subject, and click the shutter button. Perhaps you’re feeling craaaazay and pick a filter to spice up the party. Your creation hits the Interwebs and is greeted with a roaring silence. Was there something else you could have done? Perhaps taking a picture of your cat sleeping, for the 87th time, is just boring your viewers. Or – perhaps your picture snapping skills need some tweaking.
Composition
All pictures have a subject – the object that you’re interested in capturing and sharing. A good picture is much more than just a subject. It should also contain a scene. The scene helps frame the subject, giving it context, meaning, and even motion if you want.


In the gallery above you’ll see a progression of shots going from “meh” to “mmm…ok.”.
In the overhead shot, you’ll see the immediate problem is that shadows from the overhead are cast over the subject. There’s also the issue of the subject being surrounded by a boring pattern.
In the second shot, I get low with the camera. Holding it in the standard way (home button on bottom of the phone), you’ll notice that the subject still has no discernible background. We need to get lower…but how?
In the third shot, we get low (low, low, low) by employing a simple technique: flip the phone upside down! Now the camera lens will be almost level with the subject. Most phones are able to detect that the camera has been flipped and will actually save the file right-side-up.
In the fourth shot, we start adding something else in the scene to add some context (ignoring the fact this is being shot in a basement which takes away from the scene).
Next, we need to adjust the lighting of the scene. Since we’re not using external lighting sources (key lights, spot lights, etc) we have to fake it by using adjustments in our software (Instagram).
Lighting

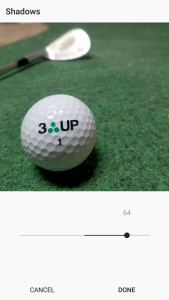

Now that we’ve got the image in Instagram, it’s time to adjust the lighting. First thing first: SKIP THE FILTERS! Jump over to manual adjustments by clicking on the “edit” button.
Reduce the shadowing under the ball by clicking on the shadow button and increasing the slider. Select “done” when you’re happy with the results. Next, tap the “highlights” button and lower the slider to reduce any specular refraction (aka, highlights) that are overpowering the image. You’ll notice that the image looks very flat at this point.
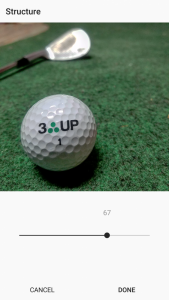
There are two ways to fix the flatness of the image after adjusting the shadows and highlights. You can use the contrast setting but I prefer using the structure setting. High structure values yield scenes that are a little more gritty – but that’s a style I like. Experiment to see what kind of scenes you can create. Have fun!